Except for the PST files that are meant for migrating mailboxes, there might be search for PST files on computers in the network that has to be archived. This can be proficiently done through PST Capture that is available in Exchange 2013, both on premise and online. It performs two major operations on PST file:

#1: Discover PST files within network, import them to on premise Exchange Server and further export the mailboxes to Exchange online. In this case, the Exchange on premise can be Exchange 2010 or 2013.
#2: Discover PST files and then import the mailbox directly to Exchange online.
PST Capture Architecture:
PST Capture is made up of following elements:
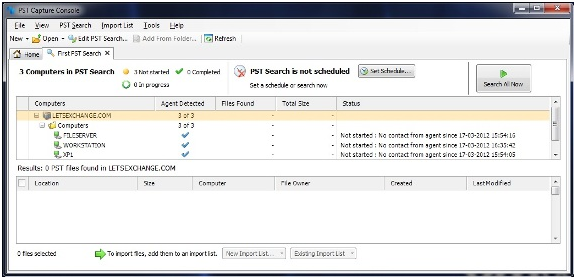
How To Search PST File
Prerequisites:
PST Capture agents must be installed on the machines from which PST files has to be searched. The host machine must have PST Capture console installed.
Procedure:
Open PST Capture Console and choose ‘New’. Click on ‘PST Search’ and a wizard will get opened.
Step 1: Select the computers that you want to search for PST files page
Here, provide names for the machines for searching PST. From the selected machine, those having PST capture agents will be displayed green. Use the following settings:
Domain:Use this option to select the domain that contains computers for PST search.
Find:This option will help to find computers that have PST files. Click on the ‘Next’ button and you can then locate the machine using the ‘Computers’ pane. If half name of the machine is defined and probably there are more than one machine, you can scroll through Previous or Next button to select the right machine.
Computers: Enable the check boxes to define the computers that are to be scanned for PST files. Also, there is option to select computers within an OE or domain.

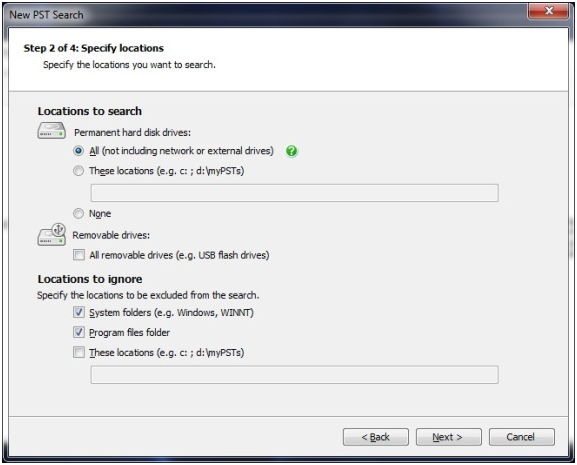
Step 2: Specify Location Page
Define a location on machines where PST files are to be searched and click Next to continue.
For Permanent Drives:
All:This will search out for the PST files within all the drives on selected machined.
These Locations:Click on this button and provide system drives for searching PST files. Multiple drives can be added, separated by semi colon.
None: Select this if you do not wish to define any drive for search.
Removable Drives: Select this option so that removable devices connected to the machines on network are also scanned for PST file.
Locations to Ignore:
System Folders: Enabling this option will ignore all the system folders like Windows.
Program Files Folder:This will ignore the default location where all programs are installed.
These Locations: Select the check-boxes for the location that should not be scanned for PST files.
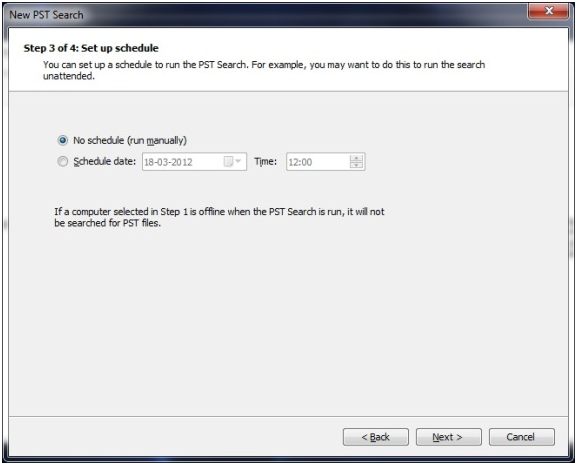
Step 3: Set Up Schedule Page
Define if you want to run the search manually or provide a time for starting up the search process. Click Next.
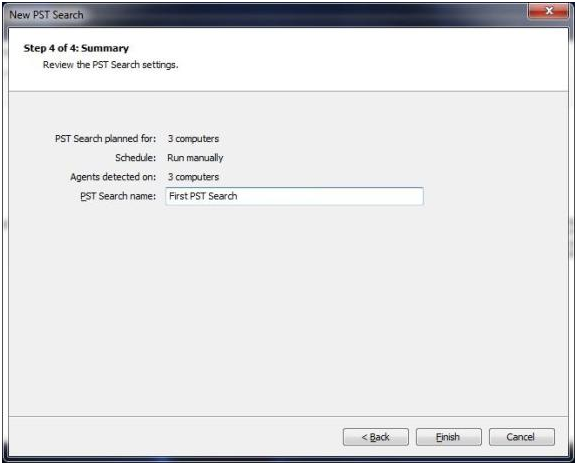
Step 4: Summary Page
Here, you can overview the selected option for search and assign a name to the search process.
Note: If you have scheduled the PST search process, then the results will be shown in the Results Pane. However, the search can be started anytime by clicking on the ‘Search All Now’ option.
 Prerequisites:
Procedure:
Step #1: Create Import List
1) In the PST Capture console, click on “New Import List” button. Depending upon where the target mailbox is located, choose between the available options: Cloud Import List or OnPrem Import List.
2) Click on “New” and then select “Import List”.
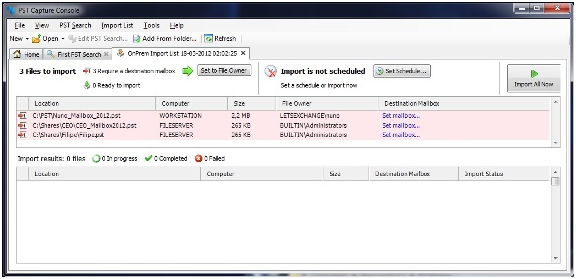
Step #2: Perform Import Process
1) Click on the ‘Import List’ tab and define a target mailbox for every PST file. In the “Destination Mailbox” column, click on ‘Set Mailbox’ link. A dialog box will get opened where mailbox for the PST file can be defined.

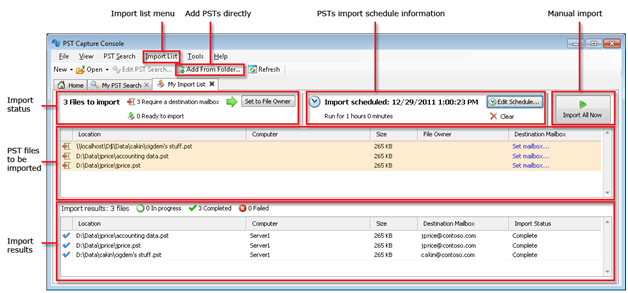
2) As stated above, the PST import process can be manually started or scheduled. In order to schedule the import, follow the steps mentioned below:
Click on “Set Schedule” and the following options will be available on screen:
Start Date: Define date and time when the PST import process should start.
Run the Import for:Select the check box if you want to suspend the import process if it does not get completed within a particular time interval. Also, define hours and minute for which you want to process the import operation.
Resume: Enable this option if you wish to resume the import operation if it gets quit before completion. Use the corresponding list to provide a frequency when import operation should resume. The import process will get started from where it ended which means no duplicates will be suspended.
Enable check box for “On resume, retry files that have failed to start importing”, so that the PST files that were not successfully imported in one attempt can be again processed.
In the “Import Results Pane”, the status of the import process will be displayed.
PST Capture is an efficient option added into Exchange 2013. It not only enables searching for the PST files within a network but also proves be a great help while working in hybrid Exchange environment. The utility can be installed and is absolutely easy to use, provided the required permissions.